This article, originally published by me in 2011, describes how to remove your Powermaster system, replacing it with Hydroboost. Hydroboost, which runs off of the power steering pump, offers superior line pressure and holding power when compared to vacuum and Powermaster setups. I won’t get into the Powermaster vs vacuum vs Hydroboost debate, but there is a reason that many turbocharged cars/diesel trucks come with Hydroboost or some modern derivative of it. Any TR owner knows that the Powermaster is a ticking bomb.
We will be using a booster, master cylinder and hoses for 1983-1985 Turbo Regals which comes in the form of remanufactured parts by Cardone. You do have many options for systems, including Chevy Astro and GMC Safari vans. Shop around since prices on each component seem to vary widely. If you decide to go with a prepackaged system, there are kits available from sources like Powerbrake-Drivetrain. These include everything you need, sans fluid, so you don’t have to run around to parts stores.
Just a word of caution. Realize you are working on components that are likely original. Be prepared to break things. I had to replace the rear wheel cylinders because the bleeders were either stuck or rounded off.
Project time:
This took me about eight hours, but I also ran into difficulties with rounded off bleeders, replacing wheel cylinders and a few other minor things.
Project cost:
Roughly $250 plus around $30 for miscellaneous parts like hose clamps, fluid, etc.
I probably have $300 in mine since I bought speed bleeders for all four wheels and new wheel cylinders.
Parts Needed:
You will need the following replacement parts from your favorite parts depot. I used Advance Auto, but the part numbers listed can be used with other parts houses like Auto Zone or Rockauto.com.
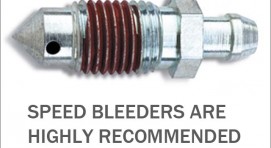
Speed bleeders … highly recommended!
Russell Speed Bleeder
Fronts are PN 639580 – 10mm
Rears are PN 639520 – 8mm
Sliding jaw clamp, c-clamp or similar device to keep the proportioning valve depressed while bleeding.
Engine paint, Eastwood Brake Gray Brake Fluid Resistant paint or Krylon Rust Tough Ceramic paint. The cast iron master cylinder WILL rust over a short period of time, so paint it with color or clear before installation. You could choose to oil it regularly with gun oil or something similar. I painted mine black post installation with some careful masking.
If you aren’t into painting, check out SharkHide Metal Protectant. I saw this stuff on Two Guys Garage and it is amazing stuff if you want to retain the cast iron look!
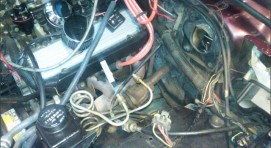
Removal of Powermaster System
Remove the alternator and belt tensioner.
You can either remove the AC compressor for more room or leave it in. I left mine in place and I was fine.
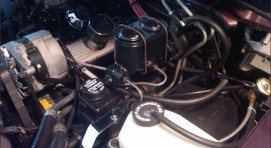
You should now have good access to the power steering pump and reservoir. You will need room since the new pressure hoses need to be connected.
Pump down the pressure in the Powermaster system. With the key off, pump the pedal fifteen times. DO NOT OVERLOOK THIS STEP! I’d advise you to cover painted surfaces just to be safe.
Remove the brake fluid from the reservoir with a fluid pump or baster. I used a Mity-Vac for this.
Disconnect the electrical connections to the Powermaster pump.
Disconnect the brake lines from the Powermaster unit.
Get inside the car. Remove the four 15mm nuts and remove the locking pin that holds the actuator rod from the PM to the brake pedal. You will definitely need socket extensions and a universal joint for this since these nuts are hard to get to. I also used a magnetic pickup tool to make sure I didn’t drop the nuts after removing them with my fingers.
Remove the actuator rod from the pedal and leave the pedal in the car. You will need a partner to hold the Powermaster unit angled up and toward the passenger side to get the pedal disconnected. It can be a bear, so take your time.
Remove the Powermaster unit as a whole. There is a rubber seal piece between the mounting plate and firewall, so remove it and re-use it when placing the hydrobooster in the car.
Pump out the power steering fluid from the reservoir using a Mity-Vac, baster, etc.
Alternator, tensioner and alternator removedOld Powermaster in placePrepped for work
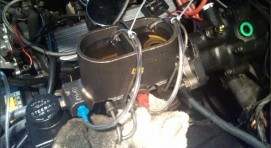
Installation of Hydroboost System
Have a helper position the booster unit in the car. They will need to reposition it a bit to give you a good angle to reattach the actuator rod to the brake pedal.
Get back inside the car and hook up the actuator rod from the pedal to the booster. Again, have a partner angle the booster unit up and toward the passenger side of the car to get the pedal connected. It’s a pain.
Use the four 15mm nuts (removed in step 8 above) to secure the booster in place. Again, a variety of extensions and a universal joint will be needed for your socket wrench.
Attach the master cylinder to the booster. You can reuse the nuts that attach the Powermaster to the firewall adapter plate.
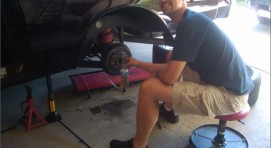
Now, you must bleed the master cylinder. You can do it on the car if you want, but you will need to jack up the rear end so that the MC is level, otherwise you will have trapped air.
Using the port adapters, screw them into the ports and connect the clear 3/16″ hose. The port adapters should come with the Cardone master cylinder, but the hose will not. The hose should go to the respective port on the MC. Make sure you have enough length to reach the bottom of the MC reservoir and zip tie the hoses in place so they don’t pop out.
Next, fill the reservoirs about 3/4 full with new brake fluid. The hoses MUST be submerged in brake fluid otherwise you will just be sucking air back into the master cylinder. Again, make sure the lines reach the bottom of the reservoir and that you have filled them 3/4 full.
With the hoses in place, you can sit in the car and bleed the master cylinder.
Slowly press the brake pedal and keep an eye on the master cylinder. You will see the air bubbles being pumped through the hoses and into the master cylinder. Take care to release the pedal in a controlled manner so you can let the air bubbles settle at the top of the tube. That way, they will be expelled on the next depress.
Repeat this until there are no air bubbles passing through the hoses to the master cylinder. This can take a LONG time.
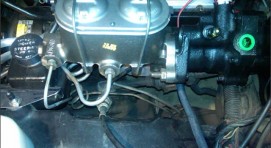
Once you are sure there is no air in the master cylinder, connect the steel brake lines to the master cylinder. With the HB master cylinder, the brake lines are the opposite of the Powermaster orientation. Connect the large line to the back port and the skinnier line to the front port on the master cylinder. Note picture 4 in this section. You can’t get this wrong because if you look at it on your car, there is no way the larger line will make it to the front port on the MC.
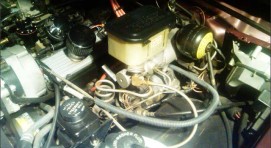
Power Master removedHydroboost installedBench bleedingLine orientation!
Bleeding the Brakes
Next, you will have to bleed/flush the entire system. You definitely need a partner to expedite the process unless you have speed bleeders, which I HIGHLY recommend. Be very careful with the rear bleeders. If you round them off, you will be replacing the wheel cylinders. Ask me how I know this. I ended up putting in new cylinders and buying four speed bleeders to be done with it.
Fill the master cylinder with new brake fluid.
Jack up the car, place it on jack stands and remove the wheels.
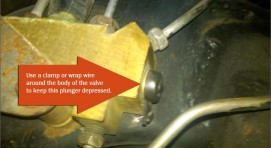
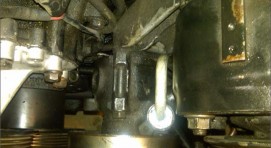
Take the rubber cap off of the proportioning valve poppet. Use a slide jaw clamp or wire on the proportioning valve shown above. Clamp the valve IN otherwise you will not get anything to the back brakes.. The valve is located on the frame rail below the master cylinder. Leave it clamped until you are completely done bleeding.
Start at the rear passenger side. Loosen the bleed screw with a deep well 8mm socket and attach a hose to it. Put the hose in a cup of brake fluid.
Depress the brake pedal slowly one time and hold. Loosen the bleeder valve to purge the air from the cylinder. Tighten bleeder screw and slowly release pedal. Wait 15 seconds. Repeat the sequence, including the 15 second wait until all air is removed. It may be necessary to repeat the sequence 10 or more times to remove all the air. Rapid pumping of the brake pedal is NOT recommended because it pushes the master cylinder piston down the bore in a manner that makes it difficult to bleed the system. You will have to pump at least 20 times to get a thorough flush but always keep an eye on the hose to see if bubbles are coming out.
Keep an eye on the brake fluid level because if you run dry you will have to start over! We actually used three people when bleeding. One at the bleeder, one at the pedal and one watching the MC fluid level.
Move to the driver’s rear, passenger front and then driver’s front using the same method in step 6. You will need a 10mm wrench for the front bleeders.
I highly recommend that you buy the Russell speed bleeders (part numbers mentioned in Optional Parts needed above). They have a check valve so you just pop them open, attach a hose and pump away. They won’t let air back in, so this eliminates the constant open and closing with regular bleeders. Basically, in step six above, eliminate the tightening of the screw. Just wait 15 seconds and pump again. Close the bleeder when you are completely done and put the rubber dust cap on it.
Installation of new pressure hoses
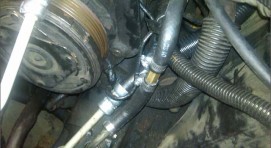
Remove the existing pressure hose from the power steering pump to the steering box itself.
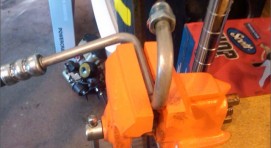
Install pressure hose (Part No: 91660) into the passenger side port of the booster and then to the power steering pump. Since it is specified for a 1983/1984 hot air car, this hose has to be tweaked 30 degrees toward the passenger side to fit the intercooled 1986/1987 cars. See the second picture below. It was put in a bench vise and bent 30 degrees to the right with pliers. You will also need to remove the return line from the pump to the reservoir to get more room to work.
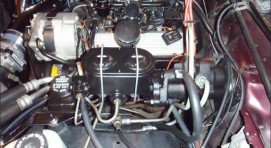
Install pressure hose (Part No: 71187) from the driver side port on the booster to the vacant port on the steering gearbox.
Install the 3/8″return hose. You will have to cut to size. Route the return hose from the return port on the booster down toward the steering gearbox as shown in picture 1 above. You will need to tap into the existing return hose with the T. You can cut the return hose down by the gearbox and install the T if you like. Use the hose clamps to secure these connections.
The T is placed in the return line pointing toward the firewall.Put the hose in a vise and tweak it 30 degrees to the right.The hose to the pump hooks up as shown
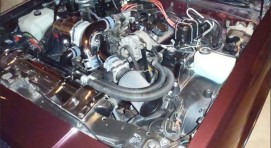
Reinstall the alternator, tensioner and A/C compressor (if necessary).
Reinstall the MAF and associated piping.
Disconnect the orange wire to the ECM so the car doesn’t start.
Fill the master cylinder to spec with new brake fluid.
Fill the power steering reservoir with new power steering fluid.
Crank the car for several seconds to fill and prime the hydroboost booster then check the power steering fluid level. Fill as needed.
Reconnect the orange ECM wire and start the car.
Flush air out of the system by turning the steering wheel from stop to stop twice.
Shut off the car.
Relieve system pressure by depressing the pedal five times.
Check the power steering fluid level and fill as needed.
Repeat steps 5-8 two times.
At this point, you are almost done.
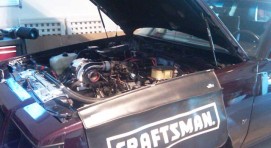
If the pedal feels good, carefully road test the car. The line pressure of the Hydroboost system should be immediately evident and you should be able to lock the brakes instantly.
The power steering pump might whine a bit at first, but it will mellow out with driving. The Hydroboost is a self purging system, meaning it will rid itself of air over time. Some people have reported that they have had to go with a stronger power steering pump to get rid of the whine but I didn’t have to do that.

 This article, originally published by me in 2011, describes how to remove your Powermaster system, replacing it with Hydroboost. Hydroboost, which runs off of the power steering pump, offers superior line pressure and holding power when compared to vacuum and Powermaster setups. I won’t get into the Powermaster vs vacuum vs Hydroboost debate, but there is a reason that many turbocharged cars/diesel trucks come with Hydroboost or some modern derivative of it. Any TR owner knows that the Powermaster is a ticking bomb.
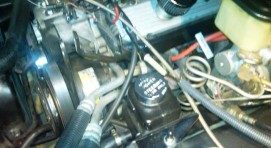


