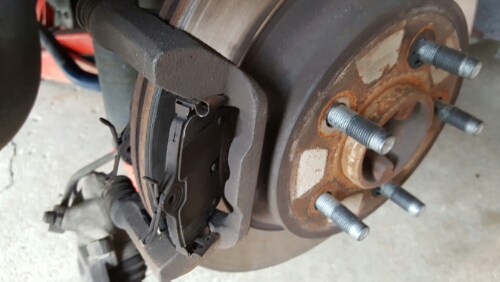
This article walks you through replacing rear pads and discs on an SN95 Mustang Cobra.
Project Time:
About an hour
Parts Needed:
- Brake tool kit that include piston compression tool – I used the loan-a-tool service at Advance Auto.
- Breaker bar
- 13mm socket and 13mm open end wrench
- 15mm socket
- 1 gallon paint bucket to set caliper on while servicing
- 11.6″ vented discs
- 14.9mm thickness pads – Brake Best C627A from O’Reilly Auto. Do NOT go to Advance Auto because they will sell you 16.8mm pads (Part GNAD627) and tell you they are correct. They are NOT. Unless you have a belt sander and calipers to measure, you won’t get them to work.
- brake grease and brake cleaner spray
Procedure:
- Loosen the lug nuts and jack up the car. Make sure to use jack stands under the axle to provide safety.
- Remove the wheels.
- Remove the two bolts holding the caliper to the mount. They are surrounded by an rubber accordion boot and are 13mm. You will need a socket for the top and an open end wrench for the bottom bolt.
- Remove the caliper and let it rest on the gallon size paint bucket. Don’t let it hang by the hoses.
- Pull out the old pads. They require a bit of force. Inspect them to see if there are any abnormal wear patterns.
- Remove the caliper mount with a 15mm socket on the top and bottom bolts. You may need a breaker bar.
- Remove the rotor.
- Take the cover off of the master cylinder.
- Using a brake install kit you must screw the piston into the bore with the tool. I rented mine from Advance Auto. DO NOT try to compress the piston into the bore with a C-clamp or you will definitely be buying a new one. You turn the tool clockwise which screws the piston into the bore. Make sure to spray the dust boot with silicone spray so that it doesn’t get bound up in the tool. Stop when it bottoms out in the bore.
- Mount the new rotor after cleaning off the rust preventative oil with brake cleaner spray.
- Mount the caliper mounting bracket with the two 15mm bolts.
- Use brake lube on the backs of the new pads and where they will slide in the caliper.
- Install the pads making sure the anti-rattle clips are mounted properly per the picture below. These were the old pads and rotors.

- Mount the caliper in place and install the upper and lower 13mm bolts.
- It is actually a good time to change out the brake fluid. I tried it with a mityvac and failed miserably so I got some Dorman M10x1.0 speed bleeders to make it a one man job. If you want to do this, start with the rear passenger and then move to driver’s rear, passenger front and driver’s front.
- Mount the wheel and hand tighten the lug nuts.
- Lower the car and retorque the lugs in a star pattern.
- Test drive the car and make sure things are correct. Do a few controlled stops from 50mph to about 5mph to break things in a bit


